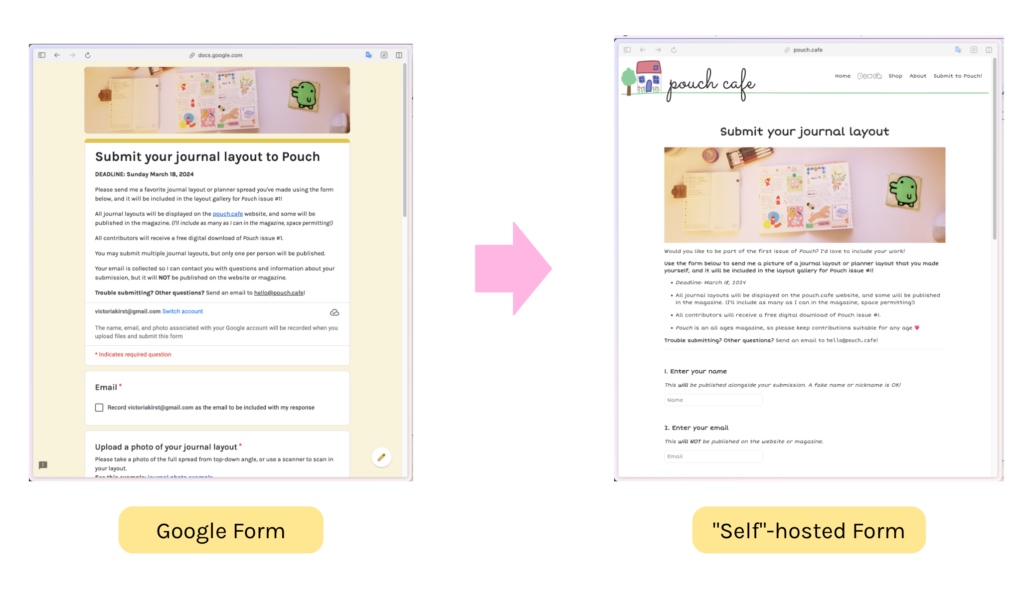
I’m pleased with my setup and I’m pleased I made the move, and I wanted to tell you about it!
I’m not going to write a tutorial because it would be FAR too long, but I will highlight the tutorials & documentation I followed as well as any gotchas on the each step.
Here we go!!
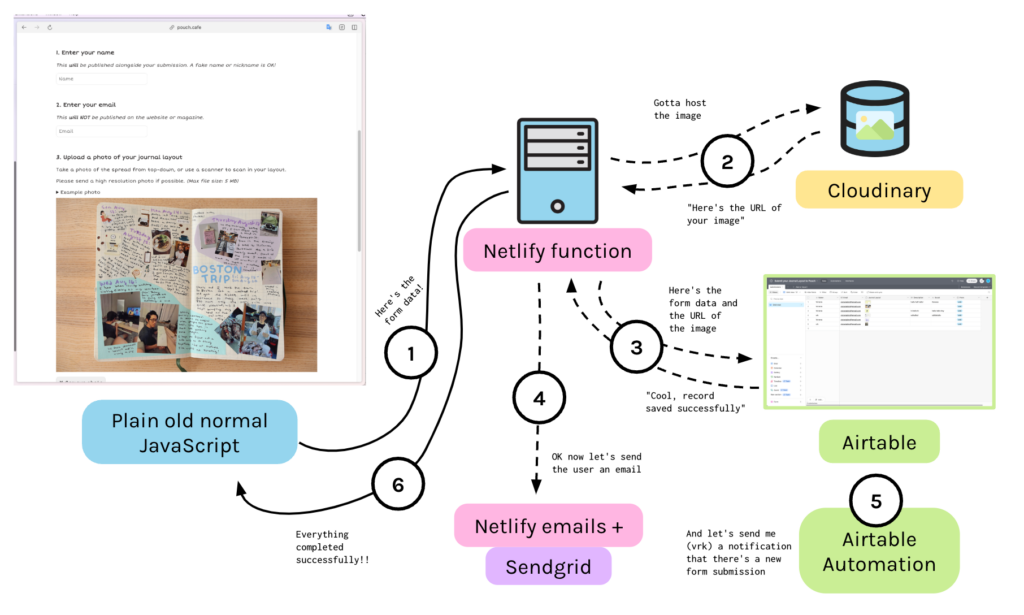
🌁 Architecture diagram
I’ll touch upon each of these things in a tad more detail but here’s a quick runthrough:
Frontend:
My frontend is just an 11ty-powered static site, which I talked about in 2021, and still holds up! It’s still my go-to setup for a simple website. (tbh the web doesn’t move that fast, but that’s a different topic).
No libraries, just native web APIs.
Backend:
I have a Netlify function that processes the form request from my frontend. CORS-restricted to only allow requests from pouch.cafe domain.
I want to host my form data in an Airtable spreadsheet, BUT there’s one wrinkle – my form requires the user to upload an image. The Airtable API doesn’t let you upload an image directly; you need to give Airtable a public URL of the image hosted somewhere else, which Airtable will then download and reupload onto their own servers. (This means you can delete the image later; the URL is just needed to do this transfer.) So for this intermediate image host, I’m using Cloudinary.
After the image is uploaded to Cloudinary, I can make the API call to add the record to my Airtable spreadsheet.
After that, I want to send the user a confirmation email of their submission! For this I am using the Netlify Email integration, which required a free Sendgrid account
I also wanted to send myself an email every time there was a new submission to the Airtable. I could have used Netlify Emails + Sendgrid, but it was simpler and no-code to configure an Airtable Automation for this step.
Once all that’s done, the Netlify function returns a status 200 back to the frontend and the form shows a success page 🥳
💿 Unintelligible GitHub Repos
I didn’t write these for anyone but me to read or use, so the code is what it is!! But I have no problems with you seeing my mess in case it can help you:
Wow I love the Form Validation API. Client-side form validation was WAY less JavaScript than I was expecting.
Particularly the required attribute is… outstanding lol. I love how it prevents form submission AND focuses & highlights the part that wasn’t filled out yet. So easy!!
Then for the form submission, I construct my own fetch request and build up the POST body by constructing the FormData object. (code)
And just for kindness, I cache the in-progress form data into LocalStorage so that you don’t lose your progress after an accidental navigation
The only real ugly part was the file submission, i.e. letting someone choose a file. So let me talk about that real quick….
👻 Tricky bit: Client-side image selection
Whereas the required attribute feels so much like the dream of modern web development (easy! native! so little code! but customizable! etc), input type="file" feels like 2000s web development lol
Aaaaand there’s no way to style this without hacks. Like you can’t change the button style, can’t change “Choose File” or “No file chosen” — AFAICT, it’s either you use ~exactly this, or you hide this element and construct your own UI that calls this underneath.
Which is what I ended up doing!
Approach #1: The input elements lives in JavaScript alone
Described in this StackOverflow post: You can create a fake UI for your image selection UI using divs or whatever you want, add a click event listener to the element, and in the event handler, dynamically create the file element and simulate the click in JavaScript:
Remember how I love the required attribute? Well in my form, the image upload is required!! But if I dynamically create the input like this, I don’t get the nice free form validation upon submit that the required attribute gives me.
So instead I wanted an approach that keeps the input element in the HTML.
Approach #2: Styled `label` with `opacity: 0` form element
HOWEVER! lol remember how I love the required attribute? In this approach, when you try to submit the form without having selected a file, the warning will appear underneath the invisible input tag, like so:
Not the worst but not ideal!
Approach #3: input within the label with opacity: 0 and height & width of 1
No StackOverflow post for this, just my brain 😎
Here’s the solution I went with:
#journal-img-input {
  /** Hacks to keep form validation API **/
  opacity: 0;
  height: 1px;
  width: 1px;
}
<label id="upload-photo" taborder="0">
  <img src="/images/add.png"  class="plus"/>
  Click to select a photo
  <input type="file" accept="image/*" required id="journal-img-input"/>
</label>
Which, if you try to submit without a photo, looks like this:
Could have done a monorepo, but ehhh that would have required mucking with my vrk/pouch.cafe frontend config and I was like ehhhh
I basically just followed Netlify Functions: Getting Started from beginning through “Synchronous function”, then skipped down to “Test Locally”. Tested locally and got Hello World working, then deployed and got Hello World working.
Updated my frontend to call into the function, which required some CORS fiddling (described in more detail below)
Gotcha #1: FYI Netlify functions must return within 10s. That’s totally fine for my use case, but just a heads up in case you were considering it for a longer request.
Gotcha #2: Netlify functions also have a 6mb payload limit for “buffered synchronous functions” — in this situation, basically that means I can’t send form data that is over 6mb. This is relevant to me because I am uploading an image from the user! So I limited the image file size to 5mb on the client. (The request will, indeed, fail on Netlify if you attempt to send more than 6mb.)
OK the CORS fiddling:
🔒 Restrict requests to only pouch.cafe origin via CORS
Because I am hosting my backend separately from my frontend, I will run into CORS issues when fetching from pouch.cafe origin, to my backend function (which is on a subdomain of netlify.app)
So I needed to send this header in my Netlify function response: "access-control-allow-origin": "https://pouch.cafe"
So instead of:
// Requests from pouch.cafe runs into CORS issues, bc function is on a different domain
export default async (req: Request) => {
  return new Response("Hello, world!")
}
Do this:
// Requests from pouch.cafe are OK
export default async (req: Request) => {
  return new Response("Hello, world!",
  {
    headers: "access-control-allow-origin": "https://pouch.cafe",
  })
}
Hackers, please kindly let me know (like, via words, not hacking) if I did this totally wrong – security stuff is not my expertise at all!
Cloudinary has a very generous free tier and was super easy to use.
My use case was a bit simpler than Chinara’s so I didn’t bother with multer, and hmm now that I’m revisiting this, I forgot to validate that the uploaded file is indeed an image 🤫 maybe I’ll patch it later today
async function uploadToCloudinary(byteArrayBuffer: ArrayBuffer): Promise<UploadApiResponse|undefined> {
  const nodeBuffer = Buffer.from(byteArrayBuffer);
  console.info('Attempting to upload buffer of size', byteArrayBuffer.byteLength)
  return new Promise((resolve) => {
    cloudinary.uploader.upload_stream((error, uploadResult) => {
    return resolve(uploadResult);
  }).end(nodeBuffer);
});}
And then the image URL is just here :
  const result = await uploadToCloudinary(arrayBuffer);
  const journalLayoutUrl = result?.url;
📝 Airtable notes & gotchas
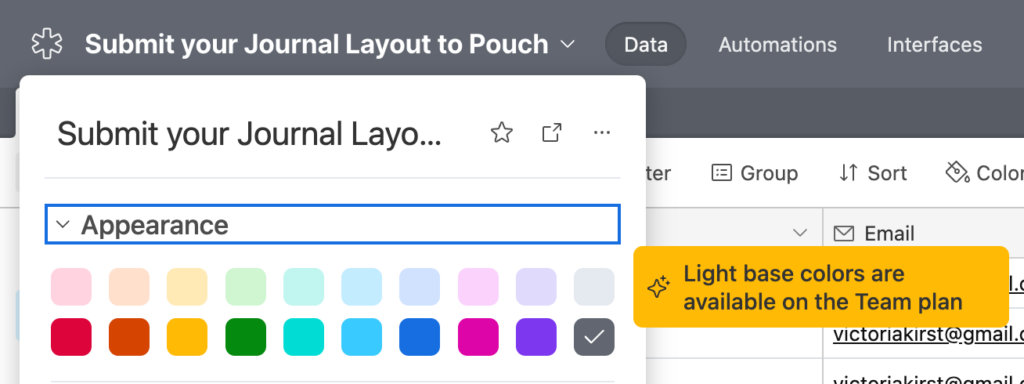
LOL OK the biggest surprise that came up while implementing my Airtable backend: Airtable makes you pay to use pastel colors?????
Like literally:
The Team plan is $24 seat/month btw lolll
sssssssiiiiiiiighhhhhhhhh!!!!!!!!!!!!!!!!!!!!!!!
sorry it’s rant time
like I understand that companies need to make money to exist and all but….who is converting to the paid tier via this upsell!!
I think I’m extra miffed because the free tier colors are borderline unusable lol. the colors almost hurt your eyeswith how bright they are!
imagine charging your users $24/month just to not be blinded by this particular shade of purple that you inflicted upon them:
LIKE WHAT
sigh but at the same time I am using airtable’s api for free, subsidized by the users who are converting to this Teams plan, presumably via upsells like this, so who am I to complain, but HERE I AM COMPLAINING
end rant
ANYWAY… I am using Airtable because they do have an incredible API that is generously available to me for free, which of course means they gotta get money somewhere……….
My Airtable is in the non-pastel Gray, btw
Other notes:
…Not really anything! I’ve used the Airtable API before. Love the interactive docs.
The image was trivial to upload once I had the URL from Cloudinary.
Gotcha: Oh yeah, I did have to do an as any cast for the attachment record, since the TypeScript types for Airtable library seems slightly wrong (it has a bunch of required fields that aren’t actually required for the write request)
📝 Netlify emails notes & gotchas
Alrighty we’re on the home stretch!
The form data is now saved in Airtable, now we gotta email the form submitter with their submission. (Not required but nice to have!)
This one was a little wonky but for unsatisfying reasons!
…but at first try I couldn’t get my local dev environment to run BOTH the Netlify Emails function (automagically generated) and my handwritten Netlify Function together. Everytime I got the Emails function to run, the other function would be killed, which meant I couldn’t test the emails functionality
I was poking around trying various things, getting nowhere, and then finally was like “eh screw it I’m gonna ditch Netlify Email and just try to use the Sendgrid API directly” — and then as soon as I started converting my code to use the Sendgrid API, the Netlify emails thing started working for me locally????
SO I HAVE NO IDEA WHAT HAPPENED!
But now that it’s working, Netlify Emails is super nice!! 😆
The only sorta? tricky part: I add the image that the user submitted as an attachment to the email by converting it to a base64 string like so:
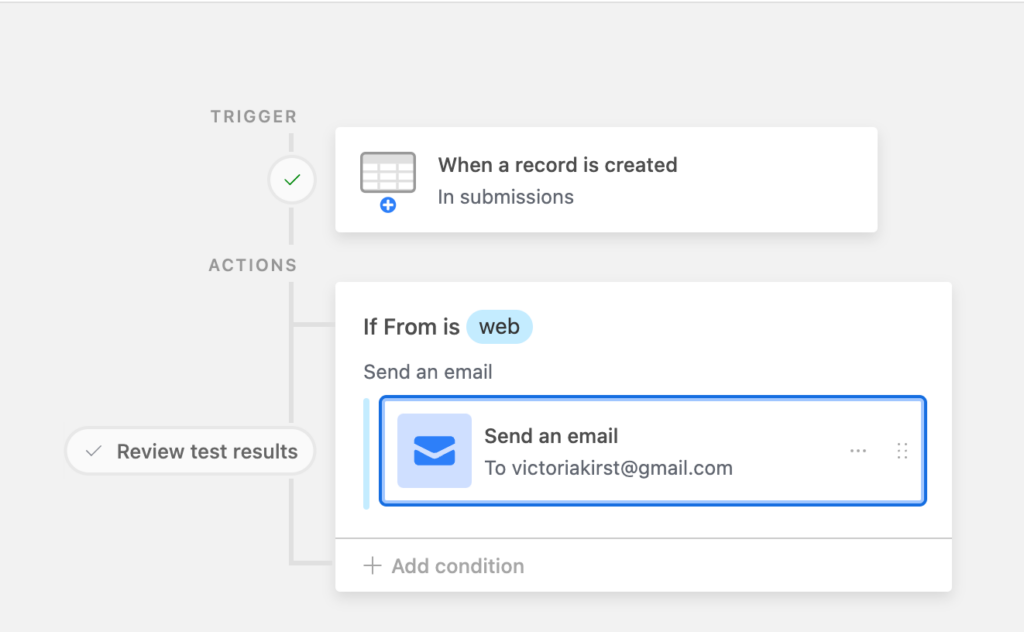
In addition to sending the user an email, I want to send myself an email every time a user submits something to my form.
I definitely could have used Netlify Emails + Sendgrid for this too!
But I was actually trying to see if I could use Airtable Automation INSTEAD of Netlify Emails + Sendgrid since that’d be simpler + no-code.
However, this was infeasible: Airtable makes you pay to send emails to anyone but owners of that spreadsheet, and AFAICT, the email sent isn’t dynamic, i.e. you can’t inject the form contents into the email that you send to folks, so wouldn’t be good for a form confirmation even if I did pay.
So nothing too much more to say, I just set up a simple email automation that looks like this:
🎉 We’re done!!
COOL
DONE
I’m super satisfied with my form!! And despite the length of this post, this took me about 1 leisurely day to complete. (Roughly half of which was spent mentally screaming about Airtable charging for pastel colors.)
I do lament that it’s 2024 and still not at all easy to create a custom form like this — sure, it took me a leisurely day, but I have over 13 years of professional coding experience, and full-stack web is my expertise!
So until it’s easier to do this stuff, I’ll occasionally leave notes like these on the internet, in hope that maybe a fragment will be helpful to someone somewhere on their own form implementation journey! ✨